Using Provider Charting Templates-ASSESSMENT Tab
Summary
The provider's diagnoses are entered on the ASSESSMENT tab, and the text generated here goes into the Assessment section of the SOAP note. This tab is only available to providers.
Completing the ASSESSMENT tab
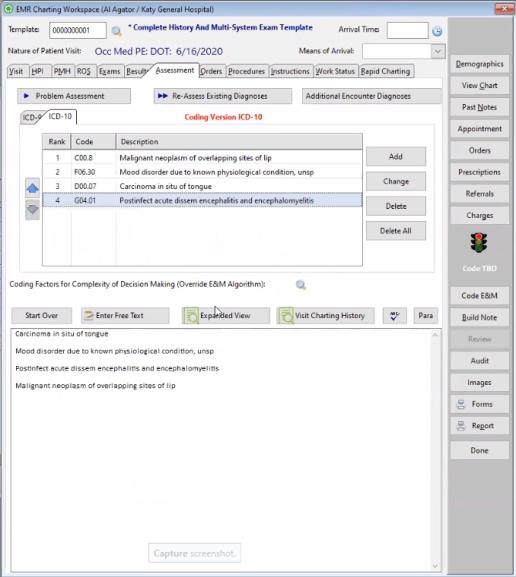
Any number of diagnoses can be added to a visit. All will be documented in the chart note and all can be added to the Problems List, but only the first twelve will appear in the ICD-9/ICD-10 Code fields seen above, Only these twelve will be printed on the insurance invoice form since it only provides space for twelve. You should be careful to select the most important one first so that it will be entered in the Primary ICD-9/ICD-10 Code field, and those others which will most affect the insurance claim in the next three slots.
Diagnosis Codes buttons
- Add: Select this button to add ICD-9 and ICD-10 codes. The following window will display:

When adding a diagnosis code in the EMR under the assessment tab, clients may use a table search to identify the correct diagnosis code. Select the table icon to the right of the ICD-10 entry box to search for a diagnosis code. The following window will display:
Below is a breakdown of the function of each search box.Search boxes 1 and 2 function similarly. Each by default search the appropriate column for entries that contain all or part of the keyword/code that was entered.
Search box 3 functions as a "begins with" search. By default, it will search in the Code column and will display codes that begin with the characters that have been entered. In-order to make a similar search using this box for the Description column, you must click on the column header first. This will make a [+] appear beside next to Description in the column header. The software will now search for descriptions beginning with the characters that have been input into search box 3.
- Change: Select this button to alter an existing ICD-9 or ICD-10code. Highlight the desired code and click change.
- Delete: Select this button to delete an existing ICD-9 or ICD-10 code. Highlight the desired code and click delete. When this button is clicked, a warning message will display to confirm your intent to remove the specific highlighted ICD-9 or ICD-10 code. Select yes to complete your request. All other codes on the list are preserved.
- Delete All: Select this button to delete all existing ICD-9 or ICD-10 codes, depending upon which tab is displayed in the window. When this button is clicked, a warning message will display to confirm your intent to remove all ICD-9 or ICD-10 codes showing in the window. Select yes to complete your request.
- Diagnosis Code Arrows: The arrows beside the ICD-10 coding window will allow users to alter the sequence of the codes one position up or down, depending on the arrow used. There must be at least two codes entered for the arrows to become active. The arrows become inactive if any of the codes are either assigned or billed.
NOTE: When the System Clinic Parameter to disable ICD-9 codes is selected and the Visit date is greater than or equal to the ICD-9 disable effective date, the system will disable the buttons (ADD, CHANGE, DELETE, DELETE ALL) on the ICD-9 tab.
Unlock Assessment button: For more information regarding how to unlock the EMR Charting Workspace that will permit adding Addendum’s to the Diagnosis code, refer tot the chapter How to Build, Sign, Lock, and Addend a Charting Note
Assessment Wizards
There are multiple methods for selecting diagnoses for the visit. All but one take you to the [Assessment and Diagnosis] window, described below, which collects additional information about the diagnosis. Appropriate text will be added to the chart note, and typically, diagnoses will be added to the Active/Chronic Problems List, although addition to the Problems List is dependent upon both setup and provider discretion.
Clicking the Problem Assessment button will display the usual [EMR Charting Template Text Elements] window with a list of check boxes. As found on other tabs, Text Elements can run a Wizard or directly insert text. Wizards on this tab are most often specialty Assessment Wizards which present a selection list of diagnoses related to the current problem from which to choose. The list is created when the Wizard is set up, and you have full control of the items available. It is also possible to have Assessment Wizards which add a single specific diagnosis to the visit, as well as standard multi-step wizards.
ICD-9/ICD-10 Assessment Wizards can include or not include anICD-9/ICD-10 code on the diagnosis record. This can be determined on an item by item basis when the Wizard is set up. That is, a selection list Assessment Wizard could include some items with ICD-9/ICD-10 codes and some without.
If in your facility, the provider is the one to determine the ICD-9/ICD-10 code, then Assessment Wizards should be set up to include them. If, on the other hand, the final determination is made by a professional coder, then the Assessment Wizards should be set up to enter a description of the diagnosis, but not the ICD-9/ICD-10 code. That allows the provider to enter a preliminary opinion, which the coder can later update with the actual ICD-9/ICD-10 code.
Diagnosis Selection Methods
There are multiple methods for entering a diagnosis to accommodate different situations:
-
Click Problem Assessment, then check one or more Text Elements which run an Assessment Wizard.
Assessment Wizards which contain a single diagnosis will take you directly to the [Assessment and Diagnosis] window.
Assessment Wizards with selection lists will display the [Select Choice] window, which presents a list of diagnoses which was created when the Wizard was set up.
-
Select the appropriate item.
-
The [Assessment and Diagnosis] window will be displayed.
-
Enter additional information as is appropriate. This process is explained below in the section on this window.
-
-
Click Problem Assessment, then the Any Diagnosis button.
This will display the full list of ICD-9/ICD-10 codes in your system. Search for and select the correct one. Generally speaking, this is a time consuming and awkward way to find a diagnosis. Effective setup of Templates and Wizards should reduce the need for this to very unusual cases.
-
Click Problem Assessment, then the Any Wizard button.
The Any Wizard button displays a list of all Wizards associated with the Problem Assessment button. Effective Template setup will minimize the need for this by including all the Assessment Wizards which are typically needed for this type of complaint. This option is most useful for multiple injury visits. You can work with the template for the chief complaint, then use this button to find and execute the Wizard(s) for the secondary problem(s). For instance, the primary problem might be a knee injury, so the selected template would be one for lower extremity problems. However, the secondary injury might be to the elbow, and the Wizard with elbow diagnoses would not be included on the lower extremity Template. Using the Any Wizard button would allow you to find and execute the elbow Assessment Wizard without first changing to the upper extremity Template.
-
Beside one of the four ICD-9/ICD-10 Code fields under the Problem Assessment button, click the numeric keypad icon to directly enter an ICD-9/ICD-10 code by number.
Use this if you know the exact ICD-9/ICD-10 code. Click the keypad icon to display a numeric keypad on which you can tap in the code with your mouse or stylus.

-
Beside one of the four ICD-9/ICD-10 Code fields under the Problem Assessment button, click the table icon to look-up an item in the full ICD-9 table.
This works exactly like the Any Diagnosis button described above by displaying the full list of ICD-9/ICD-10 codes in the system, from which you can select the one you need. This tends to be a time consuming and awkward way to find a diagnosis. Effective setup of Templates and Wizards should reduce the need for this to very unusual cases. Read the topic on Selecting ICD-9/ICD-10 Codes to learn the most effective way of finding items on this complex list which defies alphabetical lookups.
For Further information on ICD-10 codes, please refer to Chapter 5, sub chapter ICD-10.
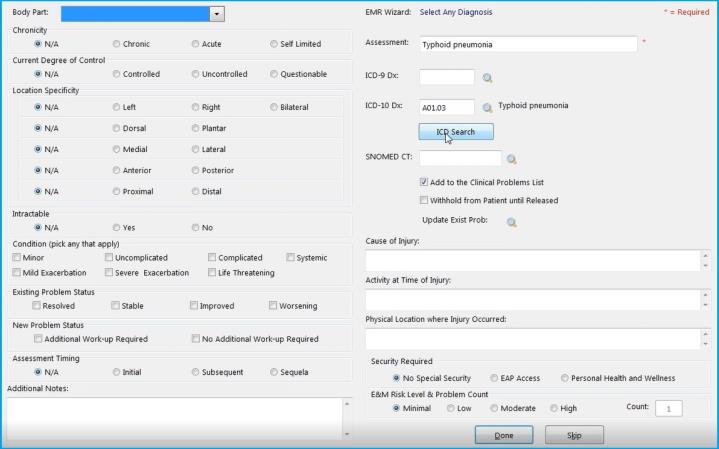
The [Assessment and Diagnosis] window
The [Assessment and Diagnosis] window, displayed after selecting a diagnosis by any of the methods above, is a specialty Wizard which gives you the opportunity to enter more details about the selected diagnosis. These are all optional. Several choices do more than simple affect the charting note text:
-
Chronicity: Increases the count of Chronic problems, seen on the ASSESSMENT tab.
- Intractable Pain: "N/A" will show nothing in the Charting note; "Yes" will display Intractable Pain - Present in the Charting note; "No" will display Intractable Pain - Absent in the Charting note.
-
E&M Risk Level and Problems Countsection: These two fields affect the E&M coding of the visit. If you reached this window after running an Assessment Wizard, they will already have default selections which were entered when the Wizard was setup. Certain choices made above such as Mild or Severe Exacerbating Conditions can also affect these. The provider can always override the settings since risk level can vary based on the details of the problem and patient circumstances.
-
Add to Problems Listcheck box: When checked, a record with the text generated for the charting note will be added to the Problems List. Assessment Wizards can be set up to automatically check or not check this box. When a diagnosis is selected by any other method, the box will be checked by default. The provider can override the default setting.
-
Withhold from Patient until Released: Meaningful Use reporting requirements include provisions for providing health information to patients. One qualification of those requirements is that a physician be able to withhold information that could be harmful to the patient until the physician releases that information. This applies to the Formal Health Record, the Clinical Summary (printed with the Encounter Summary or Work Status Report), and the patient portal. Checking this box withholds this diagnosis. It can later be unchecked in the diagnosis record on the Problems List.
-
Update Existing Problembutton:If an earlier diagnosis was entered without an ICD-9 code or if additional information is available, this button can be used to update the existing diagnosis with the diagnostic code and/or other additional information. Enter the current information on this window, then click the button to select the existing item from the Problems List to be updated. Entering an ICD-9 code for an item which does not have one will add the code to that item, not create a new one. This can be used by a professional coder to add the correct code to the provider's preliminary diagnosis (and to the visit record.) Or, it can update a still active problem from a previous visit, for instance, indicating that the condition is "worsening". This is especially useful for Workers' Comp.
NOTE: Within the Assessment wizard, on the Assessment and Diagnosis window, the system will disable the buttons associated with the ICD-9 lookup and disable the ICD-9 field only when the parameter to disable ICD-9 is set on and the Visit date is greater than or equal to the ICD-9 disable effective date.
For more information about the ICD Search button, click here.
After making all needed entries, click Done. When you return to the [Generate EMR Charting Note] window, Net Health Employee Health and Occupational Medicine will have entered the appropriate text in the charting note, added or updated the item on the Problems List when so instructed, and added the ICD-9 code on the visit if one was entered.
E&M Coding
As mentioned above, three items can be entered on the [Assessment and Diagnosis] window which factor into determining the level of documentation entered the level of E/M code it can support. If multiple diagnoses are entered, Net Health Employee Health and Occupational Medicine will combine the information from all diagnoses. Those totals will be displayed in six fields on the ASSESSMENT tab: Number of Presenting Problems, Number of Chronic Conditions, Number of Data Sources, Risk fromPresenting Problems, Risk from Management Options, and Risk from Diagnostic Procedures.
Default values for these factors can be entered when Problem Assessment and certain other Wizards are set up. It is impossible for the entries on the Wizards to be exactly correct every time for the simple reason that risk level can vary based on the details of the problem and patient circumstances. Ultimately, professional judgement is required for the final determination. For that reason, the provider can override these factors based upon his/her expert knowledge to make the level of MDM risk level more exact. This can be done for a single diagnosis on the [Assessment and Diagnosis] window, or for the combined tallies on the ASSESSMENT tab.
|
|
The accuracy of how Net Health Employee Health and Occupational Medicine evaluates the E&M level for a visit is completely dependent upon how Wizards are set up! The E&M coding information entered on all Wizards, not just Assessment Wizards should be reviewed by a coding expert. If you are a new user of Net Health Employee Health and Occupational Medicine Provider Charting, the information on the Wizards received from Net Health should be reviewed thoroughly since the interpretation of coding rules varies by state, payer, and facility. Any time a new Wizard is added, or significant changes are made in an existing Wizard, that Wizard should be reviewed by a coding expert before being put into service. |
Associated Problem
There are instances when more than one diagnostic code has been entered, and other information in the note should be associated with just one of the diagnostic codes. For instance, there might be two diagnoses, one for a possible bone fracture and the other for an open wound. If an x-ray is ordered, it should be associated with just the fracture.
To allow this, Wizards and Free Text Entry windows on certain tabs include an Assoc Problemtable icon. When that icon is clicked, the [Select Associated Problem] window will be displayed with a list of diagnoses. When you select the appropriate one, it will print following the text inserted by the Wizard. The tabs where this can be done are RESULTS, ORDERS, and PROCEDURES.
Additional Encounter Diagnosis button
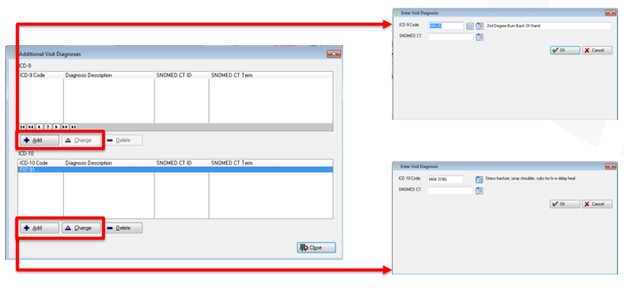
The Additional Visit Diagnosis window found within the EMR, Assessment tab, Add'l Encounter Diag button, will display all diagnosis codes, regardless of version.
The window has two panels. One for the ICD-9 codes and one for the ICD-10 codes. Users may Add/Change/Delete codes from each list box. The system displays only ICD-9 codes in the ICD-9 panel and list box and only ICD-10 codes in the ICD-10 list box.
NOTE: When selecting the button Additional Encounter Diagnoses, the system will disable the buttons on the ICD-9 panel when the parameter to disable ICD-9 is set on and the Visit date is greater than or equal to the ICD-9 disable effective date.
![]()